Water damage is an issue many homeowners face, whether from a burst pipe, heavy rain, or leaking roof. Once water has seeped into your walls, it’s crucial to address it effectively to prevent further issues like mold and structural damage. Understanding how to dry out walls quickly and thoroughly can save you from headaches down the line.
If you’re in Vancouver, Washington, the importance of knowing how to handle water damage can’t be overstated. A professional water damage restoration company can make the process easier, but it’s also helpful to know the basics yourself. By tackling the water damage promptly, you can keep your home safe and sound.
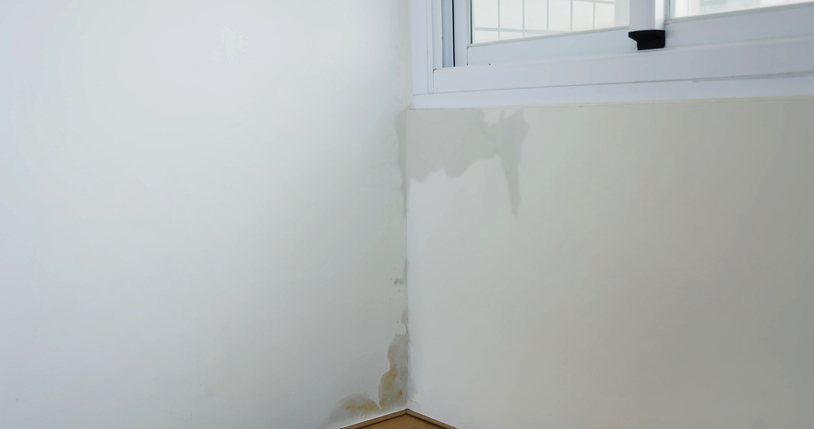
Identifying Water Damage in Walls
Before you can begin drying out your walls, it’s essential to identify the signs of water damage. Look for symptoms such as discoloration or streaks on the walls, swollen or distorted panels, and a musty smell that indicates mold is developing. Early detection is key to minimizing damage and avoiding expensive repairs.
Here are some tools and techniques you can use to check for water damage accurately:
– Moisture meters: These devices are ideal for pinpointing areas with excess moisture within your walls. They provide a clear indication of which spots need urgent attention.
– Infrared cameras: These cameras are useful in detecting temperature variations, which can suggest areas behind walls or ceilings where water may have accumulated.
– Visual inspection: Regularly monitoring your walls for visible signs, like peeling paint or warping, helps you catch problems early.
Spotting damage early allows you to act quickly, potentially preventing more severe issues like mold growth or structural weakening. Taking swift action is essential, so if you detect any signs of water damage, it’s wise to move on to drying out the affected areas as soon as possible.
Steps to Dry Out Walls After Water Damage
Once you’ve identified signs of water damage, it’s time to take immediate action to dry out your walls. Start with a thorough cleanup to remove any standing water. This can be done using buckets, towels, or a wet/dry vacuum to efficiently clear out the moisture. Make sure all of these are done as quickly as possible to prevent prolonged exposure to dampness.
Next, focus on drying out the walls. Here’s a straightforward method to ensure they dry properly:
1. Use fans and dehumidifiers: Place fans near the affected areas to blow air across the walls, speeding up the drying process. A dehumidifier will help remove moisture from the air, making drying faster and preventing humidity buildup.
2. Remove wall coverings: If you have wallpaper or paneling, take it down to allow the walls to dry completely. Wall coverings can trap moisture, which doesn’t help with drying out the walls efficiently.
3. Inspect hidden areas: Check behind baseboards and under floors if possible, as these places can hide moisture. Hidden dampness can cause mold to grow, so reaching every nook and cranny is crucial.
4. Professional-grade equipment: If the water damage is severe, consider using professional-grade equipment like industrial fans and high-capacity dehumidifiers. These are typically more effective than standard home devices.
5. Check for mildew: During the drying process, inspect the walls for mildew, which can be an early sign of mold development. If spotted, address it promptly, as mold can grow quickly in damp conditions.
Preventing Future Water Damage
After you manage to dry out your walls, it’s important to think long-term about how to prevent this from happening again. Regular maintenance and timely inspections can make a huge difference in keeping your home safe from water damage.
– Fix leaks immediately: Whether it’s a dripping faucet, a leaking roof, or a cracked pipe, address leaks as soon as you spot them to prevent water from reaching your walls.
– Ensure proper drainage: Make sure gutters, downspouts, and drainage systems are clean and direct water away from your house. Proper drainage can help keep excess moisture at bay.
– Seal windows and doors: Check the seals around windows and doors and repair them if necessary. Poor seals can let in water during storms, leading to potential damage.
– Plan regular inspections: Set up a schedule for regular home inspections, paying close attention to areas prone to water issues. Early detection of potential problems means you can fix them before they cause significant damage.
With these steps, you can maintain the integrity of your home’s structure and reduce the risk of water damage recurring. Keeping an eye on problem areas and acting swiftly can save both time and money in the long run.
The Role of Professionals
Hiring a water damage restoration company can be key to efficient and safe restoration. Professionals have specialized tools and expert knowledge to thoroughly assess and remedy damage, ensuring your home returns to its pre-damaged state.
Keeping Your Home Safe
Taking care of water damage effectively involves a good mix of immediate action and preventative measures. By being vigilant and adopting regular maintenance routines, homeowners can keep their walls dry and their homes safe. Water damage is stressful, but with the right knowledge and resources, it’s a manageable challenge.
Remember, while it’s possible to handle minor issues on your own, it’s always a good idea to seek professional help when necessary. Experts have the tools and experience to deal with even the most stubborn water damage, ensuring your walls—and your home—stay in top condition.
For those living in Vancouver, Washington, dealing with water damage can bring a lot of stress and frustration. The good news is that help is close by. If you’re looking to protect your home and make sure your walls are properly restored, reaching out to a trusted water damage restoration company is a smart move. DryWorx Water Damage Restoration has the tools and experience to get the job done right, giving you peace of mind and a safer home.